背景
存储设备产品(如SSD/eMMC)的读写速度和稳定性测试,是量产前必不可少的步骤。除了常规的两个设备来回拷贝读写,存储设备做系统盘的情况下,反复的启动,睡眠,休眠,也是重要的测试项。本文介绍这几种测试的原理,工具实现,和调试过程
系统电源状态
ACPI(高级配置与电源接口)是电源配置和接口的规范,供操作系统和应用程序管理所有电源,其定义了几种状态(State):S1~S6
操作系统在ACPI基础上实现各自的电源状态划分
Linux电源状态划分为如下: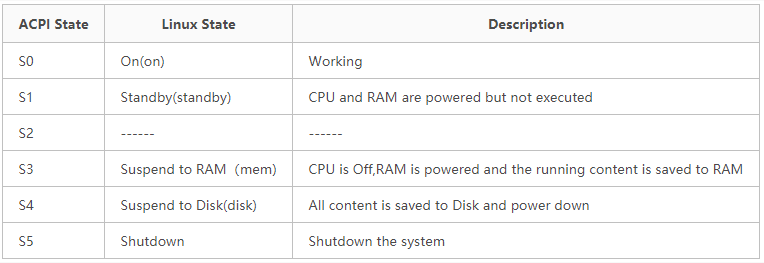
其中,常见的几种状态有别称,如S3通常也称Suspend,S4也称Hibernation, S5即shutdown。下面描述这几种状态的区别
S3:
1、将系统当前的运行状态等数据保存在内存中,此时仍需要向RAM供电,以保证后续快速恢复至工作状态
2、冻结用户态的进程和内核态的任务(进入内核态的进程或内核自己的task)
3、关闭外围设备,如显示屏、鼠标等,中断唤醒外设不会关闭,如电源键
4、CPU停止工作
S4:
挂起到硬盘,俗称休眠(Hibernation)将系统当前的运行状态等数据保存到硬盘上,并自动关机。下次开机时便从硬盘上读取之前保存的数据,恢复到休眠关机之前的状态。
譬如在休眠关机时,桌面打开了一个应用,那么下一次开机启动时,该应用也处于打开状态。而正常的关机-开机流程,该应用是不会打开的
S5:
关机并断电,实际上,S5在不同场景下,可以指代关机和重启两种操作,关机是彻底power off的,而重启不是彻底断电,只是重新启动了系统,(当然基本所有设备都被reset),重启!=关机再启动。
测试工具设计
需求:设计工具使系统从S0(working)进入S3/S4/S5状态,维持一段时间,然后退出该状态,在S0维持一段时间,再次进入S3/S4/S5状态,如此反复循环。用户输入工作模式(S3/S4/S5)和循环次数,工具输出运行日志,包含已运行次数和时间戳。
Linux测试脚本实现
Linux环境有现成的工具:rtcwake,参看其man page:
NAME
       rtcwake - enter a system sleep state until specified wakeup time
SYNOPSIS
       rtcwake [options] [-d device] [-m standby_mode] {-s seconds|-t time_t}
DESCRIPTION
       This program is used to enter a system sleep state and to automatically wake from it at a specified time.
       This uses cross-platform Linux interfaces to enter a system sleep state, and leave it no later than a specified time.  It uses any RTC framework driver that supports standard driver model wakeup flags.
       This is normally used like the old apmsleep utility, to wake from a suspend state like ACPI S1 (standby) or S3 (suspend-to-RAM).  Most platforms can implement those without analogues of BIOS, APM, or ACPI.
       On some systems, this can also be used like nvram-wakeup, waking from states like ACPI S4 (suspend to disk).  Not all systems have persistent media that are appropriate for such suspend modes.
       Note that alarm functionality depends on hardware; not every RTC is able to setup an alarm up to 24 hours in the future.
       The suspend setup may be interrupted by active hardware; for example wireless USB input devices that continue to send events for some fraction of a second after the return key is pressed.  rtcwake tries to avoid this problem and it waits to terminal to settle down before entering a system sleep.
其重要option如下:
      -m, --mode mode
              Go into the given standby state.  Valid values for mode are:

              standby
                     ACPI state S1.  This state offers minimal, though real,
                     power savings, while providing a very low-latency
                     transition back to a working system.  This is the
                     default mode.

              freeze The processes are frozen, all the devices are suspended
                     and all the processors idled.  This state is a general
                     state that does not need any platform-specific support,
                     but it saves less power than Suspend-to-RAM, because
                     the system is still in a running state.  (Available
                     since Linux 3.9.)

              mem    ACPI state S3 (Suspend-to-RAM).  This state offers
                     significant power savings as everything in the system
                     is put into a low-power state, except for memory, which
                     is placed in self-refresh mode to retain its contents.

              disk   ACPI state S4 (Suspend-to-disk).  This state offers the
                     greatest power savings, and can be used even in the
                     absence of low-level platform support for power
                     management.  This state operates similarly to Suspend-
                     to-RAM, but includes a final step of writing memory
                     contents to disk.

              off    ACPI state S5 (Poweroff).  This is done by calling
                     '/sbin/shutdown'.  Not officially supported by ACPI,
                     but it usually works.

              no     Don't suspend, only set the RTC wakeup time.

              on     Don't suspend, but read the RTC device until an alarm
                     time appears.  This mode is useful for debugging.

              disable
                     Disable a previously set alarm.

              show   Print alarm information in format: "alarm: off|on
                     <time>".  The time is in ctime() output format, e.g.,
                     "alarm: on  Tue Nov 16 04:48:45 2010".

       -s, --seconds seconds
              Set the wakeup time to seconds in the future from now.

       -t, --time time_t
              Set the wakeup time to the absolute time time_t.  time_t is
              the time in seconds since 1970-01-01, 00:00 UTC.  Use the
              date(1) tool to convert between human-readable time and
              time_t.
只需要写shell script调用rtcwake即可
注意要求跨状态记录日志,S3/S4很容易,运行信息只是被挪到内存、硬盘,不会丢失,但S5会shutdown, 因此循环次数和时间只能记录在掉电不丢失的硬盘里。
S3S4可以用一个脚本完成,而S5需要单独设计
S3S4.sh如下:
接受用户输入:
opt: S3或S4模式;COUNT:循环次数
每次执行rtcwake,日志写入LOG
opt=$1
COUNT=$2
interval=30
s3timer=120
s4timer=120
mkdir -p log
DATE=$(date +%Y-%m-%d)
LOG=log/${opt}_${DATE}.log
cat /dev/null > ${LOG}
echo "=============================== $opt test start ===============================" |tee -a ${LOG}
for (( i=1; i<=$COUNT; i++ ))
do
if [ $opt == "s3" ];then
echo "************************* S3 Cycle: $i start *************************" |tee -a ${LOG}
echo `date +%Y-%m-%d' '%H:%M:%S` "Going to S3, Duration "$s3timer" sec" |tee -a ${LOG}
sudo rtcwake -m mem -s $s3timer >> ${LOG} 2>&1
echo `date +%Y-%m-%d' '%H:%M:%S`" Waitable timer triggered." |tee -a ${LOG}
echo `date +%Y-%m-%d' '%H:%M:%S`" Wake up from S3, Cycle "$i"" |tee -a ${LOG}
echo `date +%Y-%m-%d' '%H:%M:%S`" Successfully left sleep state S3..." |tee -a ${LOG}
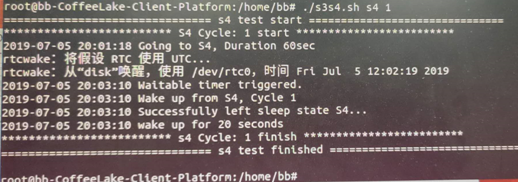
elif [ $opt == "s4" ];then
echo "************************* S4 Cycle: $i start *************************" |tee -a ${LOG}
echo `date +%Y-%m-%d' '%H:%M:%S` "Going to S4, Duration "$s4timer" sec" |tee -a ${LOG}
sudo rtcwake -m disk -s $s4timer >> ${LOG} 2>&1
echo `date +%Y-%m-%d' '%H:%M:%S`" Waitable timer triggered." |tee -a ${LOG}
echo `date +%Y-%m-%d' '%H:%M:%S`" Wake up from S4, Cycle "$i"" |tee -a ${LOG}
echo `date +%Y-%m-%d' '%H:%M:%S`" Successfully left sleep state S4..." |tee -a ${LOG}
else
echo "error input, use s3 or s4 as input"
fi
echo `date +%Y-%m-%d' '%H:%M:%S` "wake up for $interval seconds" |tee -a ${LOG}
echo "************************* $opt Cycle: $i finish *************************" |tee -a ${LOG}
#keep wake up time
sleep $interval
done
echo "=============================== $opt test finished =============================== " |tee -a ${LOG}
S5必须要解决两个问题:
1.每次测试的信息如何跨越重启
2.如何使系统自动不断的重启
对于1,可以将日志写入固定文件,每次重启后读该文件并追加,知道S5循环结束
对于2,Linux有开机自动启动某些桌面程序、shellscript的机制
S5测试脚本分为三部分:
配置自启动并执行首次重启的脚本:s5_start.sh
执行单次S5的脚本,即自启动调用的脚本:s5.sh
停止S5,清楚自启动配置的脚本:s5_stop.sh
s5_start.sh
#!/bin/bash
USER=$(users)
opt=s5
interval=30
s5timer=180

#config autostart
mkdir -p /home/$USER/.config/autostart
touch /home/$USER/.config/autostart/s5.desktop
echo "
[Desktop Entry]
Type=Application
Exec=gnome-terminal -e /home/$USER/s5.sh
Terminal=true
X-GNOME-Autostart-enabled=true
" > /home/$USER/.config/autostart/s5.desktop
chmod 777 /home/$USER/.config/autostart/s5.desktop
echo "config autostart finished"

#config sudo
echo "$USER ALL=(ALL) NOPASSWD:ALL" >> /etc/sudoers

#config s5 log and temp file
mkdir -p log
DATE=$(date +%Y-%m-%d)
LOG=log/${opt}_${DATE}.log
cat /dev/null > ${LOG}
echo "1" > ${opt}_cycle.txt
echo "$LOG" > ${opt}_log.txt
chmod 777 -R ./*.sh ./log/*.log ./*.txt

echo "System will shutdown after "$interval" sec, then restart after "$s5timer" sec"
echo "*********************** S5 Cycle: 1 *************************" |tee -a ${LOG}
echo `date +%Y-%m-%d' '%H:%M:%S` "Going to S5 after "$interval" sec" |tee -a ${LOG}
sleep $interval

rtcwake -m off -s $s5timer >> ${LOG} 2>&1
s5.sh
#!/bin/bash
COUNT="999"
opt=s5
interval=30
s5timer=180
cycle=$(<${opt}_cycle.txt)
LOG=$(<${opt}_log.txt)

#update cycle
((cycle++))
echo "$cycle" > ${opt}_cycle.txt

#keep wake
echo "*********************** S5 Cycle: $cycle *************************" |tee -a ${LOG}
echo `date +%Y-%m-%d' '%H:%M:%S` "Going to S5 after "$interval" sec" |tee -a ${LOG}
sleep $interval

sudo rtcwake -m off -s $s5timer >> ${LOG} 2>&1
s5_stop.sh
#!/bin/bash
USER=$(users)
opt=s5
rm -f /home/$USER/.config/autostart/s5.desktop
rm -f ${opt}_cycle.txt ${opt}_log.txt
sed -i '/NOPASSWD/d' /etc/sudoers
测试脚本使用
S3
./s3s4.sh s3 999 启动s3测试,运行999次

S4
S4在内存和硬盘直接读写运行时映像,硬盘需要指定那一块区域用于和内存交换,即交换分区。Linux一切皆文件,交换分区也可以用swapfile配置。以下配置swapfile
df –h 查看挂载点为/对应的文件系统是/dev/nvme0n1p2,根据你具体情况记录

blkid查看UUID值,根据1对应的nvme文件系统记录UUID
filefrag –v /swapfile查看swapfile的物理起始地址,记录physical_offset左侧值将UUID和physical_offset值写入grub:
终端输入gedit /etc/default/grub ,修改以下参数并保存GRUB_CMDLINE_LINUX_DEFAULT="quiet splash resume=UUID=你的UUID值 resume_offset=你的physical_offset值“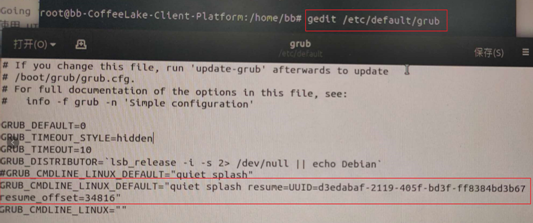
重新生成grub: 终端输入
update-grub回车并重启电脑。
启动S4脚本
./s3s4.sh s4 999
S5
自动重启需要先解决账户密码问题
设置普通账户自动登录:
普通账户为装系统时设置的账户,重启后默认以普通账户登录
1.终端输入gedit /usr/share/lightdm/lightdm.conf.d/50-ubuntu.conf弹出编辑界面
设置以下参数,ctrl+s保存后关闭
[Seat:*]
user-session=ubuntu
autologin-user=你的账户名
2.终端输入gedit /etc/gdm3/custom.conf,设置以下几行的值为如下
# Enabling automatic login
AutomaticLoginEnable = true
AutomaticLogin =你的账户名
重启,确认可免密码登录桌面。
./s5_start.sh 启动s5
./s5_stop.sh 结束S5
Dmesg分析和调试
dmesg简介
dmesg命令显示linux内核的环形缓冲区信息,我们可以从中获得诸如系统架构、cpu、挂载的硬件,RAM等多个运行级别的大量的系统信息。当计算机启动时,系统内核(操作系统的核心部分)将会被加载到内存中。在加载的过程中会显示很多的信息,在这些信息中我们可以看到内核检测硬件设备
注意:
dmesg只记录从启动到当前时间的信息,掉电丢失
使用示例:
dmesg //默认输出
dmesg | less //从头分页显示
dmesg | tail -100 //显示最后100行
dmesg | head  -100 //显示最早100行
dmesg | grep -i usb //包含usb的信息,忽略大小写
dmesg -C //清除log
输出示例:
[root]# dmesg | grep sda

[    1.280971] sd 2:0:0:0: [sda] 488281250 512-byte logical blocks: (250 GB/232 GiB)
[    1.281014] sd 2:0:0:0: [sda] Write Protect is off
[    1.281016] sd 2:0:0:0: [sda] Mode Sense: 00 3a 00 00
[    1.281039] sd 2:0:0:0: [sda] Write cache: enabled, read cache: enabled, doesn't support DPO or FUA
[    1.359585]  sda: sda1 sda2 < sda5 sda6 sda7 sda8 >
[    1.360052] sd 2:0:0:0: [sda] Attached SCSI disk
[    2.347887] EXT4-fs (sda1): mounted filesystem with ordered data mode. Opts: (null)
[   22.928440] Adding 3905532k swap on /dev/sda6.  Priority:-1 extents:1 across:3905532k FS
[   23.950543] EXT4-fs (sda1): re-mounted. Opts: errors=remount-ro
[   24.134016] EXT4-fs (sda5): mounted filesystem with ordered data mode. Opts: (null)
[   24.330762] EXT4-fs (sda7): mounted filesystem with ordered data mode. Opts: (null)
[   24.561015] EXT4-fs (sda8): mounted filesystem with ordered data mode. Opts: (null)
输出时间戳是从上电开始,到当前的时间,以秒为单位。
调试S4 hang
在测试中发现,nvme存储设备,首次进入S4的时间较长,约30s, 且系统处于hang状态,鼠标无法移动。
dmesg查看单次S4 enter & resume的过程,log如下
[   43.090180] PM: hibernation entry          //开机43秒进s4流程
[   43.090579] PM: Syncing filesystems ...
[   43.090682] PM: done.
[   43.090684] Freezing user space processes ... (elapsed 0.003 seconds) done.   //冻结用户进程,这个时候会hang
[   43.093699] OOM killer disabled.
[   43.093876] PM: Marking nosave pages: [mem 0x00000000-0x00000fff]       //准备哪些内存要转存到disk
[   43.093878] PM: Marking nosave pages: [mem 0x0005f000-0x0005ffff]
[   43.093880] PM: Marking nosave pages: [mem 0x000a0000-0x000fffff]
[   43.093887] PM: Marking nosave pages: [mem 0x80185000-0x80186fff]
[   43.093889] PM: Marking nosave pages: [mem 0x88c4f000-0x890acfff]
[   43.093944] PM: Marking nosave pages: [mem 0x89214000-0x89efefff]
[   43.094102] PM: Marking nosave pages: [mem 0x89f00000-0xffffffff]
[   43.098151] PM: Basic memory bitmaps created
[   43.098541] PM: Preallocating image memory...
[   43.143802] hpet_rtc_timer_reinit: 29 callbacks suppressed
[   43.143803] hpet1: lost 2 rtc interrupts
[   43.197779] hpet1: lost 2 rtc interrupts
[   43.251708] done (allocated 333315 pages)               //分配内存侧的交换页
[   43.251709] PM: Allocated 1333260 kbytes in 0.15 seconds (8888.40 MB/s)
[   43.251710] Freezing remaining freezable tasks ... (elapsed 0.126 seconds) done.
[   43.379023] printk: Suspending console(s) (use no_console_suspend to debug)
[   43.381268] serial 00:02: disabled
[   43.382187] parport_pc 00:01: disabled
[   43.701432] ACPI: Preparing to enter system sleep state S4  //准备进S4, 关CPU, 中断,
[   44.400195] PM: Saving platform NVS memory
[   44.404308] Disabling non-boot CPUs ...
[   44.404935] IRQ 123: no longer affine to CPU1
[   44.404942] IRQ 132: no longer affine to CPU1
[   44.405979] smpboot: CPU 1 is now offline
[   44.410695] smpboot: CPU 2 is now offline
[   44.414738] IRQ 122: no longer affine to CPU3
[   44.415784] smpboot: CPU 3 is now offline
[   44.422078] PM: Creating hibernation image:           //准备创建disk映像
[   44.503241] PM: Need to copy 330336 pages
[   44.503242] PM: Normal pages needed: 330336 + 1024, available pages: 1731140
                                                                                       //磁盘写入操作和时间没有记录
[   44.901845] PM: free pages cleared after restore    //S4已被唤醒,这里不是绝对时间,S4休眠时间未记入
[   44.901889] PM: Restoring platform NVS memory
[   44.903440] Enabling non-boot CPUs ...
[   44.903474] x86: Booting SMP configuration:
[   44.903474] smpboot: Booting Node 0 Processor 1 APIC 0x2
[   44.904974]  cache: parent cpu1 should not be sleeping
[   44.905085] CPU1 is up
[   44.905101] smpboot: Booting Node 0 Processor 2 APIC 0x4
[   44.905478]  cache: parent cpu2 should not be sleeping
[   44.905602] CPU2 is up
[   44.905618] smpboot: Booting Node 0 Processor 3 APIC 0x6
[   44.905995]  cache: parent cpu3 should not be sleeping
[   44.906125] CPU3 is up
[   44.908816] ACPI: Waking up from system sleep state S4
[   45.003392] usb usb1: root hub lost power or was reset
[   45.003393] usb usb2: root hub lost power or was reset
[   45.006573] sd 0:0:0:0: [sda] Starting disk
[   45.006732] parport_pc 00:01: activated
[   45.008262] serial 00:02: activated
[   45.384656] ata1: SATA link up 3.0 Gbps (SStatus 123 SControl 300)
[   45.384717] ata2: SATA link down (SStatus 4 SControl 300)
[   45.384741] ata3: SATA link down (SStatus 4 SControl 300)
[   45.384758] ata6: SATA link down (SStatus 4 SControl 300)
[   45.384779] ata5: SATA link down (SStatus 4 SControl 300)
[   45.384798] ata4: SATA link down (SStatus 4 SControl 300)
[   45.387712] ata1.00: configured for UDMA/100
[   45.500662] usb 1-9: reset low-speed USB device number 2 using xhci_hcd
[   46.056539] usb 1-10: reset low-speed USB device number 3 using xhci_hcd
[   46.318112] nvme nvme0: 4/0/0 default/read/poll queues
[   46.336791] nvme nvme0: ctrl returned bogus length: 2 for NVME_NIDT_EUI64
[   46.363904] acpi LNXPOWER:07: Turning OFF
[   46.363916] acpi LNXPOWER:06: Turning OFF
[   46.364472] PM: Basic memory bitmaps freed
[   46.364474] OOM killer enabled.
[   46.364475] Restarting tasks ... done.   //恢复进程
[   47.098831] e1000e: eno1 NIC Link is Up 100 Mbps Full Duplex, Flow Control: None
[   47.098837] e1000e 0000:00:1f.6 eno1: 10/100 speed: disabling TSO
[   49.489104] video LNXVIDEO:00: Restoring backlight state
[   49.489109] PM: hibernation exit    //S4退出完成
比较奇怪的是,dmesg没记录写磁盘的操作,时间戳上也反映不出来。可能这时候IO交给DMA了,kernel就挂起了,所以dmesg无法工作,包括时间戳记录??
为了验证S4 hang原因在于写磁盘,对不同SSD做读写测速:
DISK               :         R/W speed MB/s   :       S4 hang time
Samsung SATA SSD   :         567/529          :       4s
Our SSD            :         170.1/104.7      :       25s
基本验证读写速度和S4 hang是线性关系。