Printk详解 printk参考Kernel document: 使用printk记录消息
其中printk是一组4个值,分别是:current , default , minimum 和 boot-time-default . 调试打印一般只配置current和boot-time-default = 7 (支持< pr_debug的打印)或者8 (支持= pr_debug的打印).
printk的基础用法 常用示例如下,一般是手动添加打印代码时使用:
1
2
step1: 例如要打印当前函数被调用,添加pr_info("%s\n", __FUNCTION__) step2: echo 7 > /proc/sys/kernel/printk
Tips1: 非root用户不能成功执行sudo echo 7 > /proc/sys/kernel/printk,显示permission denied
原因:因为sudo仅让echo按root权限执行,没有让>按root权限执行
解决办法一:sudo su进入root用户
解决办法二:dmesg配置printk级别:sudo dmesg -n 7
解决办法三:解决任何sudo echo写入的权限问题:
sudo sh -c "cmd",让bash将整个cmd字符串当一个命令执行,并赋予root权限
1 sudo sh -c "echo 7 > /proc/sys/kernel/printk"
再cat /proc/sys/kernel/printk可见printk已变成7,4,1,7(默认是4,4,1,7)
Tips2: (printk持久化)系统启动自动设置打印级别:
/proc/sys/kernel/printk每次启动后都恢复为默认值4,4,1,7.
在/etc/sysctl.conf添加kernel.printk可以系统启动时自动配置打印级别, 通常用于记录kernel boot阶段的打印:
1
2
sudo vim /etc/sysctl.conf kernel.printk = 8 4 1 8 #8: 打开包括pr_debug的所有打印级别
小结:
如果要观测系统启动中的driver debug打印,必须/etc/sysctl.conf配置kernel.printk
如果要观测系统启动后的driver debug打印,建议使用dmesg -n修改printk
printk在driver subsystem中的使用 Linux driver子系统通常使用printk的封装版。以pci driver为例,pci driver代码已经提供了pci_dbg, pci_info, pci_err等打印函数,其不仅打印arg信息,也打印pci port设备信息,例如以下PCIe driver的log:
pcieport 0000:00:1b.4 显示了当前的PCIe port。如果有多个PCIe port的打印,可以区分是哪个port的打印输出。
1
2
3
4
5
[ 44.713266] pcieport 0000:00:1b.4: DPC: containment event, status:0x1f01 source:0x0000 [ 44.713268] pcieport 0000:00:1b.4: DPC: unmasked uncorrectable error detected [ 44.713274] pcieport 0000:00:1b.4: PCIe Bus Error: severity=Uncorrected (Non-Fatal), type=Transaction Layer, (Receiver ID) [ 44.713277] pcieport 0000:00:1b.4: device [8086:43c4] error status/mask=00200000/00004000 [ 44.713280] pcieport 0000:00:1b.4: [21] ACSViol (First)
如何设置dev_info, dev_err:
pci_info, pci_err的打开和pr_info, pr_err一致,只需要设置打印级别大于info/err即可:
1 echo 7 > /proc/sys/kernel/printk
其他驱动模块的xxx_info, xxx_err也是一样
如何设置dev_dbg:
dev_dbg是比较特殊但常用的打印方式,定义如下。
可见dev_dbg的开启依赖于两个条件:
driver定义了CONFIG_DYNAMIC_DEBUG 或者 DEBUG 宏才能开启,一般使用DEBUG宏
printk级别需要为8(7为debug level, 8 > debug level,才能开启debug打印)
1
2
3
4
5
6
7
8
9
10
11
12
13
14
15
#if defined(CONFIG_DYNAMIC_DEBUG) || \ (defined(CONFIG_DYNAMIC_DEBUG_CORE) && defined(DYNAMIC_DEBUG_MODULE)) #define dev_dbg(dev, fmt, ...) \ dynamic_dev_dbg(dev, dev_fmt(fmt), ##__VA_ARGS__) #elif defined(DEBUG) #define dev_dbg(dev, fmt, ...) \ dev_printk(KERN_DEBUG, dev, dev_fmt(fmt), ##__VA_ARGS__) #else #define dev_dbg(dev, fmt, ...) \ ({ \ if (0) \ dev_printk(KERN_DEBUG, dev, dev_fmt(fmt), ##__VA_ARGS__); \ }) #endif
以pci_dbg为例(内部实现是dev_dbg),要打开pci_dbg设置如下:
1
2
3
4
5
6
7
在Kernel Makefile定义DEBUG宏,可以在driver/pci的Makefile定义,也可以在Kernel根目录Makefile定义: 方式一:DEBUG宏定义在KCFLAG,即编译此目录的任何driver .o, .ko都定义了DEBUG宏 KCFLAGS += -DDEBUG 方式二:DEBUG宏定义在某一个driver模块,即编译此模块时定义了DEBUG宏,例如 obj-${CONFIG_PCI} += -DDEBUG
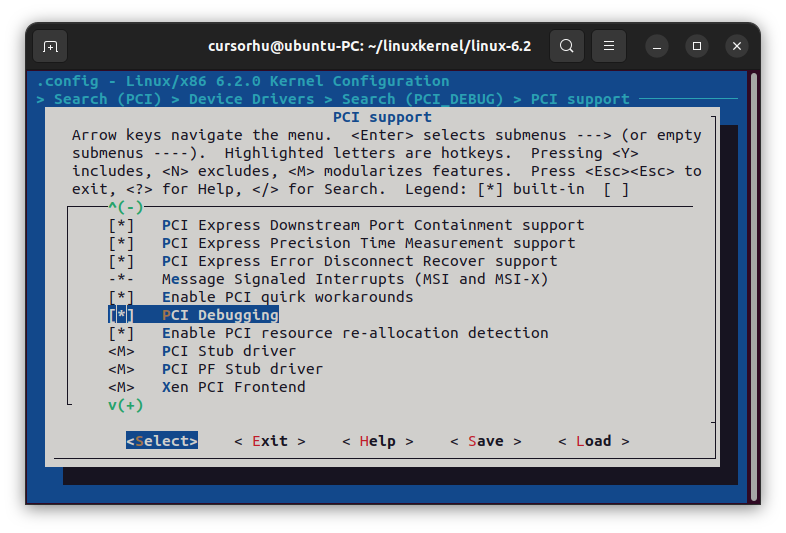
以上是对任意Driver模块打开DEBUG宏的通用方法;实际上drivers/pci已经定义了KCONFIG可选项如下,只需要make menuconfig时设置PCI_DEBUG = y 即可对drivers/pci的当前目录和子目录的模块编译都定义DEBUG宏:
1
2
3
4
5
6
7
8
9
10
11
12
13
### Makefile: subdir-ccflags-$(CONFIG_PCI_DEBUG) := -DDEBUG ### Kconfig: config PCI_DEBUG bool "PCI Debugging" depends on DEBUG_KERNEL help Say Y here if you want the PCI core to produce a bunch of debug messages to the system log. Select this if you are having a problem with PCI support and want to see more of what is going on. When in doubt, say N.
最后设置printk level大于DEBUG level:
1 echo 8 > /proc/sys/kernel/printk
此后dmesg可查看drivers/pci下的所有pci_dbg都被打印(当然也包括pci_info, pci_err等)。
如何快速定位CONFIG项 以PCIe driver为例,drivers/pci的Makefile有以下CONFIG
1 subdir-ccflags-$(CONFIG_PCI_DEBUG) := -DDEBUG
现在make menuconfig时想快速定位CONFIG_PCI_DEBUG对应的位置再设置为y,定位操作如下:
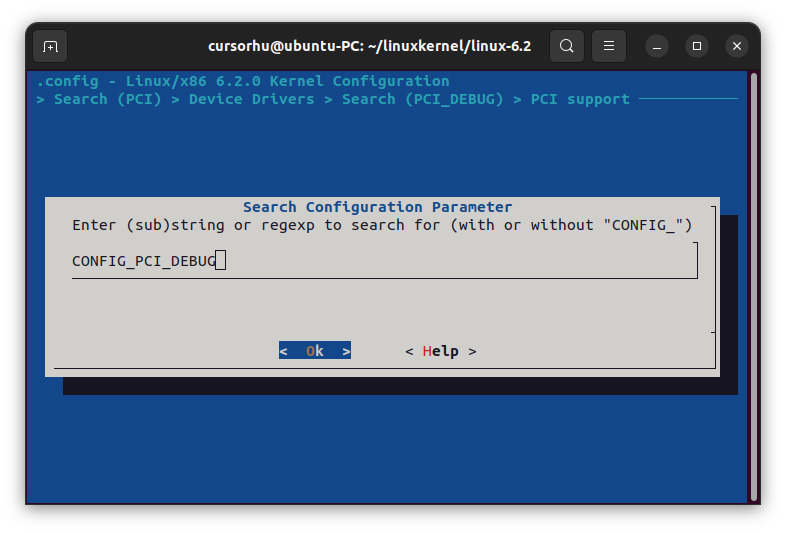
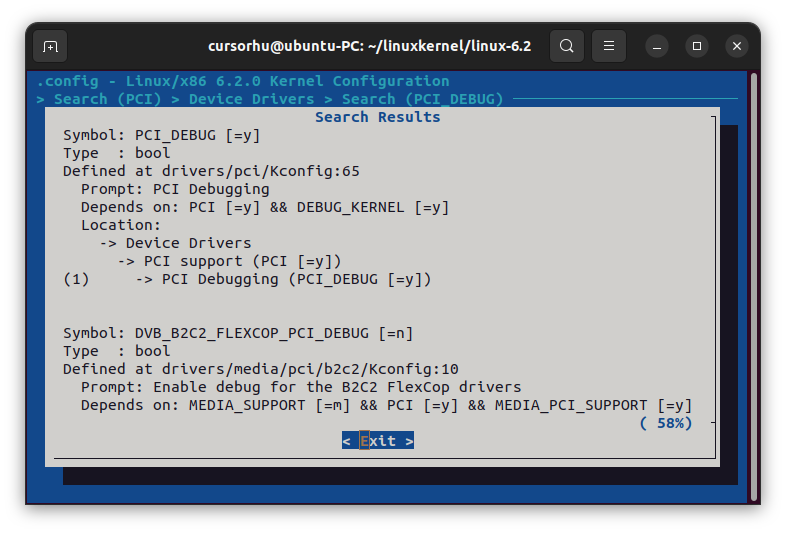
step1: 输入/ 打开查找,输入要查找的CONFIG名,注意这里不支持模糊匹配
step2: 按1跳转到CONFIG对应位置
直接修改.config文件 make menuconfig本质是配置.config文件,可以手动修改CONFIG_XXX = y/m
Ftrace详解 ftrace是printk之外,能观测driver/kernel的函数(symbol)调用流程和执行时间的重要debug功能。
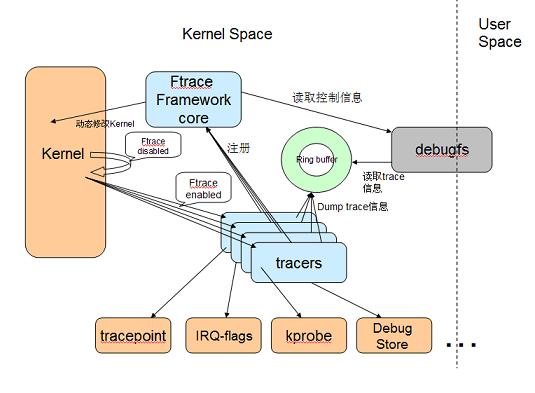
ftrace的系统框图如下,只需要配置用户空间暴露的trace文件,就可以读取kernel的trace buffer信息:
ftrace的完整使用教程和原理,参考:
Mastering Embedded Linux Programming
Linux Tracing Technologies
function_graph使用示例 在ftrace相关Kconfig和debugfs已开启情况下,如下是查询sleep调用了哪些function
1
2
3
4
5
6
7
sudo su #用root操作debugfs cd /sys/kernel/debug/tracing #进入tracing目录,方便操作trace文件 echo function_graph > current_tracer 当前tracer使用function_graph模式 echo 1 > tracing_on #开启trace sleep 1 #执行要trace的操作 echo 0 > tracing_on #(可选)关闭trace cat trace #查看trace的输出文件
部分关键函数调用流程如下:
1
2
3
4
5
6
7
8
9
10
11
12
13
14
15
16
17
18
19
20
21
22
23
24
25
26
27
28
29
30
31
32
33
34
35
36
37
38
39
40
41
42
43
44
45
46
47
48
49
50
51
52
53
54
55
56
57
58
59
60
61
62
# tracer: function_graph # # CPU DURATION FUNCTION CALLS # | | | | | | | 3) | cpuidle_enter() { 3) 0.271 us | tick_nohz_get_next_hrtimer(); 3) | cpuidle_enter_state() { 3) | leave_mm() { 3) | switch_mm() { 3) | switch_mm_irqs_off() { 3) 0.441 us | load_new_mm_cr3(); 3) 0.299 us | switch_ldt(); 3) 1.661 us | } 3) 2.193 us | } 3) 2.721 us | } 3) 0.271 us | sched_idle_set_state(); 3) | intel_idle_ibrs() { 3) 0.273 us | spec_ctrl_current(); 3) # 8916.545 us | } 3) 0.608 us | sched_idle_set_state(); 3) | irq_enter_rcu() { 3) | tick_irq_enter() { 3) 0.394 us | tick_check_oneshot_broadcast_this_cpu(); 3) 0.466 us | ktime_get(); 3) 0.337 us | nr_iowait_cpu(); 3) 0.379 us | tick_do_update_jiffies64(); 3) 3.274 us | } 3) 3.996 us | } 3) | __common_interrupt() { 3) | handle_edge_irq() { 3) 0.348 us | _raw_spin_lock(); 3) | irq_chip_ack_parent() { 3) 0.526 us | apic_ack_irq(); 3) 1.275 us | } 3) | handle_irq_event() { 3) 0.332 us | _raw_spin_unlock(); 3) | __handle_irq_event_percpu() { 3) | e1000_intr_msi [e1000e]() { 3) 0.322 us | napi_schedule_prep(); 3) | __napi_schedule() { 3) 0.320 us | __raise_softirq_irqoff(); 3) 0.982 us | } 3) 4.938 us | } 3) 5.759 us | } 3) | add_interrupt_randomness() { 3) 0.334 us | fast_mix(); 3) 0.982 us | } 3) 0.340 us | note_interrupt(); 3) 0.322 us | _raw_spin_lock(); 3) 9.578 us | } 3) 0.323 us | _raw_spin_unlock(); 3) + 13.112 us | } 3) + 13.883 us | } 3) | irq_exit_rcu() { 3) | __do_softirq() { .... 3) ! 135.293 us | } 3) 0.371 us | idle_cpu(); 3) ! 136.785 us | } 3) # 9079.848 us | } 3) # 9080.993 us | }
和cpuidle_enter 源码对照一致
注意多个CPU的trace可能混杂,例如下面是CPU1和3交替执行:
1
2
3
4
5
6
7
8
9
10
11
12
13
14
15
16
17
18
19
# tracer: function_graph # # CPU DURATION FUNCTION CALLS # | | | | | | | 1) | cpuidle_enter() { 1) 0.158 us | tick_nohz_get_next_hrtimer(); 1) | cpuidle_enter_state() { 1) 0.174 us | leave_mm(); 1) 0.158 us | sched_idle_set_state(); 1) | intel_idle_ibrs() { 1) 0.158 us | spec_ctrl_current(); 1) # 3924.061 us | } 3) # 7847.617 us | } 1) 0.337 us | sched_idle_set_state(); 3) 0.323 us | sched_idle_set_state(); 1) | irq_enter_rcu() { 1) | tick_irq_enter() { 3) | irq_enter_rcu() { 1) 0.210 us | tick_check_oneshot_broadcast_this_cpu();
trace函数的过滤(ftrace_filter) 查看有哪些symbol(function)可以作为trace过滤关键字,一般kernel和已加载的driver函数都在此列表中
1
2
cat available_filter_functions #查看所有symbol cat available_filter_functions | grep pci #查看所有名字带pci的symbol
一个symbol list示例如下(grep pci),其中带[]的是Driver Module的symbol, 不带的为build-in kernel的symbol:
1
2
3
4
5
6
7
8
9
10
11
12
13
14
read_pci_config read_pci_config_byte write_pci_config write_pci_config_byte ... pciehp_probe pciehp_configure_device pciehp_isr pciehp_ist ... sdhci_pci_enable_dma [sdhci_pci] sdhci_pci_remove_slot [sdhci_pci] nvme_pci_complete_rq [nvme] nvme_pci_enable [nvme]
trace带pci关键字的symbol,示例如下:
1
2
3
echo "" > trace #清空现有trace信息 echo "*pci*" > set_ftrace_filter #设置过滤关键字 echo 1 > /sys/bus/pci/rescan #执行trace操作:rescan所有pci设备
关键流程的trace输出如下,pci_scan_slot 是rescan的核心操作:
1
2
3
4
5
6
7
8
9
10
11
12
13
14
1) | pci_scan_slot() { 1) | pci_scan_single_device() { 1) | pci_get_slot() { 1) 0.912 us | pci_dev_get(); 1) 2.467 us | } 1) | pci_bus_generic_read_dev_vendor_id() { 1) | pci_bus_read_config_dword() { 1) | pci_read() { 1) 9.293 us | pci_conf1_read(); 1) + 10.669 us | } 1) + 12.057 us | } 1) + 18.047 us | } 1) + 31.012 us | } 1) + 32.412 us | }
trace过滤的高级用法 假设想trace某个driver module的所有symbol, 如果仅靠函数关键字很难实现
解决办法:将available_filter_functions经过文本处理(sed/awk/grep)后,输出要trace的driver module的所有symbol列表,再写入set_ftrace_filter文件。
以下示例trace driver module名为bht_sd的所有symbol:
1
2
lsmod | grep bht_sd #首先确认module已加载 cat available_filter_functions | grep bht_sd #查看module的symbol是否存在于available_filter_functions
grep bht_sd输出的部分symbol如下:
1
2
3
4
5
bht_sd_resume [bht_sd] bht_sd_suspend [bht_sd] bht_sd_pci_release [bht_sd] bht_sd_remove [bht_sd] bht_sd_probe [bht_sd]
用grep, awk过滤一下,只保留函数名,去掉[module名]
1 cat available_filter_functions | grep bht_sd | awk '{ print $1 }'
输出:
1
2
3
4
5
6
bht_sd_resume bht_sd_suspend bht_sd_pci_release bht_sd_remove bht_sd_probe ...
再写入set_ftrace_filter(要一段时间),用一个命令处理:
1 cat available_filter_functions | grep bht_sd | awk '{ print $1 }' > set_ftrace_filter
查看set_ftrace_filter可见Driver module的symbol又添加了[module名],可能是ftrace_filter自己添加的索引信息
1
2
3
4
5
bht_sd_resume [bht_sd] bht_sd_suspend [bht_sd] bht_sd_pci_release [bht_sd] bht_sd_remove [bht_sd] bht_sd_probe [bht_sd]
对该Driver设备操作(例如device rescan),cat/vim trace输出正常:
1
2
3
4
5
6
7
8
9
2) | bht_sd_probe [bht_sd]() { 2) 2.516 us | os_memset [bht_sd](); 2) | DbgInfo [bht_sd]() { 2) 0.911 us | fls32 [bht_sd](); 2) 0.850 us | os_memcpy [bht_sd](); 2) 5.089 us | os_print [bht_sd](); 2) + 12.315 us | } ...
另外一种对.ko用nm命令输出symbol,参考:defeattroy/用Ftrace跟踪内核模块


